Two days back I took the decision to move from All in One SEO to Yoast’s WordPress SEO plugin. WordPress SEO automatically adds several new columns to the posts admin screen. Coupled with the columns that Jetpack adds, along with those added by my Top 10 and Where did you go from here plugins, I ended up with the post title column being one character long! To fix this view, I needed to disable the columns from displaying via the Screen Options dropdown available in every admin screen.
In this post, I’ll guide you through the screen options in the “All Posts” and “Dashboard” pages.
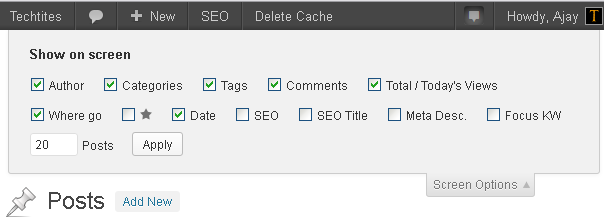
Screen Options on the All Posts screen
The All Posts screen is my main screen of entry into the blog. I have this bookmarked in all my browsers. Hence, it’s also essential for me to keep this clean with only those columns I need.
To configure this screen, click on Screen Options in the top right of your browser window, just below where your name appears after you’re logged in. Depending on which plugins you have installed, you’ll see something like this.
A standard WordPress install will give you the five options, i.e. Author, Categories, Tags, Comments and Date. The remaining options / checkboxes you see in the screenshot are added by the various plugins that I mentioned above my my WordPress installation. I didn’t need them all and to hide those columns, all I needed to do was uncheck the boxes above. I get the following columns in my Posts screen now.
The last option “20 Posts” lets you control how many posts should be visible on the posts screen. I’m comfortable with the 20 posts. However, depending on your requirement, you can choose to increase or decrease this.
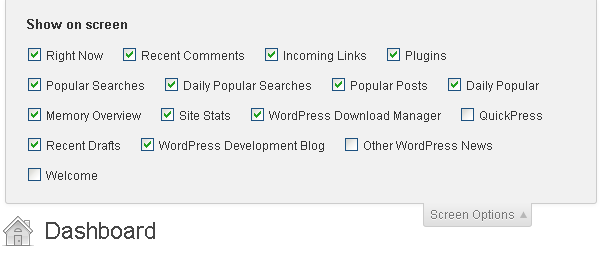
Screen Options on the Dashboard
The Dashboard screen is usually the first screen that most users login to and it’s been designed to give you a quick view of everything that’s going on on your blog.
Many plugins will add their own widgets to the Dashboard and after a while you might end up with more widgets than you really care about. This is again where the screen options dropdown helps you clean the dashboard.
Depending on which plugins you have, you’ll see some or many of the widgets below.
The concept is exactly the same as the previous case. You can check and uncheck whichever widgets you don’t want. This helps speed up the dashboard slightly if you do tend to visit it often.
Other screens
I won’t delve into much detail of the Screen Options on the other screens, but the concept is the same. Each screen has its own options that allow you to configure the number of items that are detailed. So, go ahead and play around.
We use cookies to ensure that we give you the best experience on our website. If you continue to use this site we will assume that you are happy with it.OkPrivacy policy